This is meant to be read with the source code ( https://github.com/seedy1812/Speedball_demo )
The map in Speedball is larger than what can be seen using the ZX Spectrum Next hardware . It has the same width 320 pixels ( 40 tiles ) but is much taller than 256 pixels ( 32 tiles ). So the map is held elsewhere in memory and a window into it is copied over for the hardware to display.
At the bottom of the screen I use the last row ( pixels 248-256 ) as the hud. We also have to consider that to have smooth scrolling i need to display an an extra row. If you start half a tile in ( 4 pixels ) that’s your first row , then you have 30 rows of 8 pixel and the a last row of 4 pixels (total of 248 pixels . That would be 32 rows but we have only 31 rows to show the map so reduce the visible area by clipping off the top 8 pixels.
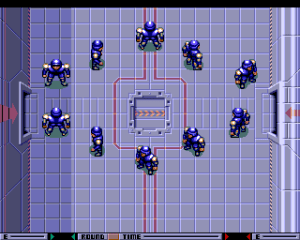
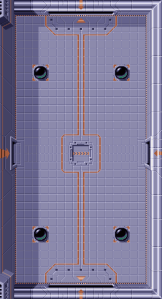
I created a the map from an image I got off the internet. When is is created into a map its size is 40 *72 and is made up of 445 tiles which is no repeating tiles but they can be rotated. As the number of tile takes up about 11K I knew that if I was to add extra tiles to do extra things ( such as the ball launcher rotating or replace tiles with powerups) then this size would increase ( i would need extra tiles for the hud ) so I may not have enough space in Bank 5 to hold everything. So i decided to use Bank 7 for the map. The plan for later was to have 2 maps stored in Bank 7 which would have the map copied over and so I could do animating tiles.
As the Speedball map and the Next map is 40 tiles wide (320 pixels ) i could just copy over the data as a block copy. Initially I used and ldir but replaced it with a single DMA memcpy which is perfect for this map. If the maps had different widths then a series of DMAA calls would be needed.
As I had more than 256 tiles I had to have map entries as 16 bit , this meant each entry can be unique ( mirror X , mirror Y , rotation and palette ). I decided that the main map would be in the first 16 colours and the hud in the next. This meant uploading 32 palette entries and at the start of each from I would set where window into the map and the where its tiles come from. I then have a copper which will set where the hud tiles are and remove any scrolling ( so its stationary) . Now as the tilemap is draw -32 pixels above the top of a normal ULA screen. The copper has to trigger on line 248-32 but this is a bit too late. By writing the registers at the start of that line its takes a bit of time and you can see a transition. So I trigger the copper at the end of the line before ( 216-1,320 ). Now this is perfect of real hardware but the way CSpect handles the copper at the beginning of a line you can see a line of garbage.
I also clip the sprites to this window (0,0) (320-1,248-1).
In the interrupt which happens at the bottom of the screen I need to get the Map set up before it start starts drawing at the top. If Some things happened in the middle of the screen you would see a tear. The demo has a couple of variables MAP_X and MAP_Y these relate to which pixel on the map is the top left one shown. MAP_X is always 0 ( no need to scroll in the x ) and MAP_Y ping pongs between 0 and MAP_HEIGHT-WIEW_HEIGHT-1 ( if it was any bigger you would see past the end of the map ) this is 592-248-1 = 343. The trick is to use the HW to shift the map vertically for part of a tile which is (MAP_Y AND 7 ) but we have a gap at the top of 8 pixels which need to adjust by ((MAP_Y AND 7 ) – 8 ) . this handles the hardware scrolling , but we need to copy the map to where the hardware can use it. I set up MMU 6 to where the whole map lives and MMU7 to BANK7 . I then have to copy 40*2*31 bytes over using DMA to $e000 from MAP_ADDRESS+(MAP_Y/8)*(40*2)
